
Print Templates
Answer
Print Templates
What are they?
ILLiad uses a series of customizable word documents as templates that create receiving, paging, and shipping labels using merged ILLiad data (produced from the ILLiad client during print transactions and saved as .xls (Excel spreadsheets) in C:\Documents\ILLiad\Print). The default location for Word files is c:\Program Files\ILLiad\Print but you can also store them on a server.
How does it help?
When properly managed, one set of print templates can be used by all ILL workstations. Layout, font, imported data and textual content on the paper form can be changed to fit the needs of staff using forms to process requests.
Getting started
Sorting and printing templates
Print templates can be sorted from within the client itself. You can specify how to sort each template (for example, by Call Number or Journal Title) using the Print Configurations settings in the ILLiad Client. You only need to configure this once. Look for Print Configurations under the Printer Setup selection.


For quicker printing, it is highly recommended that you do not choose to view the templates prior to printing. Viewing the templates can cause PC slowdowns on older machines and Microsoft Word will occasionally turn unresponsive for a minute or so. For one-click printing (highly recommended), you can also choose not to be prompted each time you want to print.

Upgrading your customized templates for ILLiad 8.1+
8.1 templates offer a more expansive use of data within the customized form. The newer templates use data merged from Excel spreadsheets versus .dbf files. If you have customized your print templates, you will need to change the source from LegacyQueue$ to PrintQueue$ and reassign field names.
Transitioning to the new templates offer libraries the ability to add to forms a borrowing department or lending department email address. Also, several templates now offer the ability to merge and display data from other modules (example – adding the Lending Library’s address to a Borrowing label). To make the conversion, do the following for each template that you use:
-
Find your templates. Not sure where they are? In the Customization Manager pull up: System|General|PrintDocumentsPath
-
Make a back up copy of your print folder or specific templates before editing.
-
Designate to work on a template you’ve customized. (Example: LendingArticleSlips)
-
Rename the original in the Print folder (to perhaps: LendingArticlesSlipsOriginal) before placing your customized template into the folder.
-
Copy and paste your original customized template into the Print folder.
-
Now open your customized Template. If you receive a message below, please note that the newer templates run on “PrintQueue$” not “LegacyQueue$”. Answer ‘No’. [Your print template should open].
-
In Word click on the Mailings tab.
-
Locate the Select Recipients|Use Existing List
-
Now you will be locating and matching the corresponding Data File (or .xls file) to the Word template. Please refer to the Atlas link for matching templates with Data Files:
https://prometheus.atlas-sys.com/display/illiad/Customizing+Printer+Templates -
Navigate to the corresponding file located in your C:\Program Files\ILLiad\Print folder (on 64-bit machines, it’s C:\Program Files (x86)\ILLiad\Print). The corresponding file for LendingArticleSlips is StacksP.xls
-
Now, select PrintQueue$ and click OK
-
Your template will come up with the old LegacyQueue$ data (ex. <<Transactio>> )
-
Begin changing the fields by:
-
Highlighting an old field name. Don’t forget! If you have toggle codes (“if” and “then” merge fields), highlight the area where they reside and <right click> and select <Toggle Field Codes> to reveal the codes needing to be changed.
-
Select Insert Merge Field and select the corresponding field name. In this case Transactions_TransactionNumber
-
-
Save after you’ve finished renaming all of the fields.


|
Tip: Getting your barcodes to print Barcode field not working? In plain text it should be input as: *«Transactions_TransactionNumber»* Then convert that entire string to the 3 of 9 barcode font. |
Sample print templates
The following templates are for use with ILLiad 8.1 and above, as they are linked to the Print Queue for each Excel data source. (If running a 32-bit PC, you may be prompted to locate the Excel file. If so, your templates are stored in C:\Program Files\ILLiad\Print\).
BorrowingArticleLabels
This is used as a simple cover sheet for articles that are not delivered electronically. Because such articles are often picked up from a service desk, these cover sheets feature the patron’s name prominently at the top. No barcode is included since such articles will already be in the status of Request Finished.

Download print template: BorrowingArticleLabels
BorrowingLoanSlips
These slips are used for received borrowing loans. Folded in half, the left side contains information for the patron and the right side contains ILL office information (including a mailing label for “Mail to Address” patrons).

Download print template: BorrowingLoanSlips
BorrowingReturnSlips
Each ⅓ sheet slip contains a return label at the bottom. If needed, just cut it off and affix it to your packaging for easier mailing.

Download print template: BorrowingReturnSlips
DocDelArticleSlips
These ⅓ sheet slips are designed to provide the most useful information for stacks searching, without using too much paper.

Download print template: DocDelArticleSlips
DocDelLoanLabels
These ⅓ sheet slips are designed to provide the most useful information for stacks searching, without using too much paper. A convenient mailing label will appear at the bottom of each slip if the patron is set to Mail to Address.

Download print template: DocDelLoanLabels
LendingArticleSlips
These ⅓ sheet slips are designed to provide the most useful information for stacks searching, without using too much paper.

Download print templates: LendingArticleSlips
LendingLoanSlips
Each ⅓ sheet slip contains a mailing label at the bottom. If needed, just cut it off and affix it to your packaging for easier mailing.
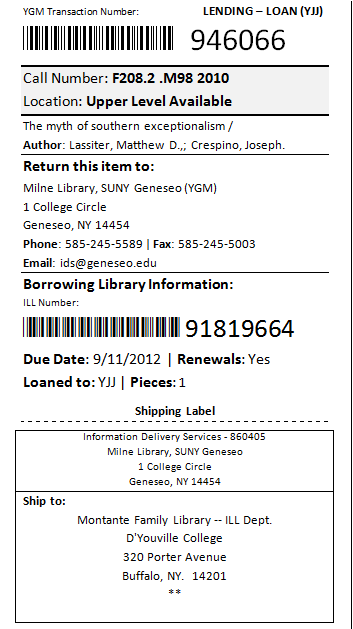
Download print template: LendingLoanSlips
Alternate LendingLoanSlips:

Download Alternative with Barcode print template: LendingLoanSlips with Barcode